or

"Hey, I can do that!"


Friday, August 28, 2009

Course 3 Supply List

I got a supply list for my first class of Wilton Course 3:


Items I don't have:
  • tip #5 ("master set" my ass)
  • 2 featherweight decoratoring bags (last one I owned busted when my icing was too stiff)
  • 24 oz. of fondant (I think I only bought a 8 oz. box)
  • pink or rose icing colors (I might pick some up tomorrow at the All In One Bake Shop)
I told my instructor, Dolly, that I had 15" parchment triangles. She said that I didn't need the 2 featherweight bags then.

Italian Meringue Buttercream (IMBC)

I've been researching "boiled icing" and have found many buttercream versions. It's basically "Italian Meringue" with butter. I've seen several people say that boiled icing tastes like marshmallows and holds up better in warm weather, but work fast because it sets quickly. Opinions on buttercream with boiled icing say that it's ultra smooth and not grainy. I've been displeased with the Wilton buttercream recipe because my piping always looked gunky (except when I used the chocolate version). My husband complained that it tasted grainy. I hope to try out one of the boiled buttercream recipes I've found soon.

Here's an excerpt from Cooking by James Peterson:


Here's a great YouTube video of a recipe from CakeLove.com:

http://www.youtube.com/watch?v=IxWmiHRTMz8

1 cup sugar
1/4 cup water
Bring to a boil until 245 degrees.

5 egg whites
Beat low until frothy, then beat high.  Add 2 oz. sugar when egg whites form stiff peaks.

Add syrup slowly. 

Add 16 oz. butter.

I've seen a lot of posts where people have trouble keeping this kind of icing stabilized. I'm a little concerned about trying it since it's August in Texas. Apparently heat and IMBC are natural enemies.

Here's another recipe from www.make-fabulous-cakes.com:
http://www.make-fabulous-cakes.com/buttercream-frosting.html

Thursday, August 27, 2009

Pound Cake

In one of the cake decorating books I read, it suggested using pound or Madeira cakes for decorating because it shapes and holds up fondant well. I found a Paula Deen recipe for pound cake on Food Network's website ... but that got me thinking ... why is it called pound cake? Wikipedia to the rescue!

http://en.wikipedia.org/wiki/Pound_cake
Pound cake refers to a type of cake traditionally made with a pound of each of four ingredients: flour, butter, eggs, and sugar. However, the quantity is often changed to suit the size of the cake that is desired. As long as the ratio is preserved, the resulting cake will generally be very similar to that using the traditional quantities. Hence, any cake made with a 1:1:1:1 ratio of flour, butter, eggs, and sugar is also called a pound cake, even if the quantity used is smaller or larger than an actual pound.

Tuesday, August 25, 2009

YouTube: Covering Cakes with Fondant

I figured I needed to watch some videos of how people cover cakes with fondant without getting any pleats or wrinkles.

This chick totally pwns the cake:
http://www.youtube.com/watch?v=We26gwKS_tw

This chick is less awesome, but she does mention the tip of "Don't pull down on the sides of the cake. Pull up to prevent cracking on the top."
http://www.youtube.com/watch?v=vecmy4nKT-A

This one shows her releasing the air bubbles while rolling the foodant and also while smoothing the fondant against the cake:
http://www.youtube.com/watch?v=0bLp3B-mFus

Skill Points

You may have notice my skill points meter. This is how I'm monitoring my goal of becoming an awesome cake decorator. I gave myself 90 points for all of the research I've done and the cakes prior to this blog. Now, for every completed cake, I will award myself 5 points. That means I've got 58 cakes to go before I reach my goal. That seems fair, right? Wish me luck!

Aluminum Dredge


I'd like to express my appreciation for this simple tool. I purchased a 10 oz. aluminum dredge from Ace Mart at $1.75. Now I know there's no excuse to not have one of these. I filled mine up with cornstarch (kids, be sure to label it before your husband thinks it's powdered sugar and sprinkles it over pancakes or something like that). Whenever I'm working with fondant, I shake this little can over my workspace and poof! Evenly dispersed powdery shield that prevents stickage. No more pinching from the bag and trying to sprinkle it myself and making more of a mess than I need.

Plus I can fill it with powdered sugar and sprinkle it over previously mentioned pancakes.

Makes me feel like a pro.

Get one.

Monday, August 24, 2009

Dragon Age: Completed

Dragon Age inspired cakes!
(+10 skill points -> 110/400)
Digg my article
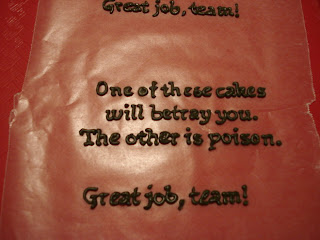
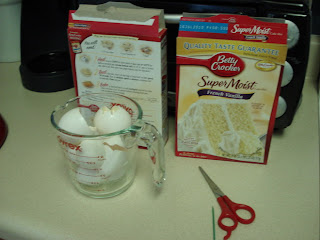
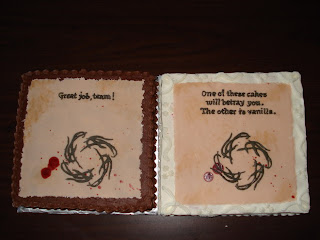
Here are the finished Dragon Age inspired cakes. Dragon Age is due in stores later this year, and I wanted to make cakes for those hardworking individuals that are going to make that happen. The cake designs resemble the loading screen in the game. There is a cool emblem that spins while hint text displays up top. The cake on the left is french vanilla cake with chocolate buttercream filling and icing. The cake on the right is red velvet cake with cream cheese frosting filling and buttercream icing.

I'm really proud of the work I did here. Not only did it turn out pretty cool, it brightened up the day for my wonderful coworkers. Everyone had a good laugh and a yummy treat.

Now for the play by play.

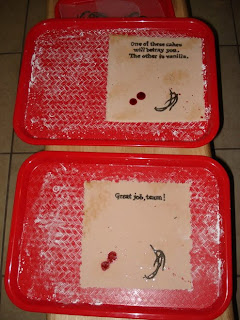
On Thursday I worked on the lettering by copying some printed text with royal icing (see previous post). This was a WIN. The letters turned out great, and I was able to pop them off the paper and glue them on to the cakes without an ordeal. At the end, I changed the wording from "The other is poison." to "The other is vanilla." because I thought it'd be funnier. The cakes were intentionally misleading.


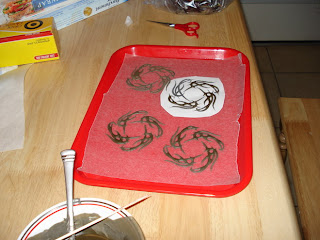
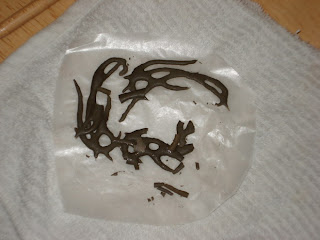
Friday was spent trying to create the emblems with that same royal icing but watered down. It was hard to get a good consistency because I needed something that could flow but not be too runny. In the end, it was a FAIL. The icing was too thin to come off the wax paper without breaking.


I did have a Friday WIN. The marshmallow fondant turned out great. It was super easy to make and working with it was just like the store-bought stuff. The taste wasn't awesome, but it was significantly better. It really just tasted like stiff marshmallows.

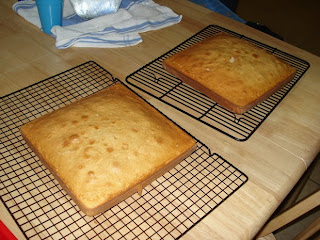
Saturday was reserved for baking and decorating the fondant. Some day I'd really like to try a pound cake from scratch. Though box cake tastes great, it's very moist and difficult to work with. It's very soft and fluffy, you lose a lot of definition with these kind of cakes. Some of my corners got ripped right off while icing.


I had to buy another 10" square pan so I could bake 2 cake batches at once. Another FAIL. I didn't use the baking strips because I figured the pans were shallow enough for the cake to bake evenly. Wrong! The lowest point of the cake was about 1 inch thick. I trimmed off so much, I had enough for a third cake!


After covering each layer with plastic wrap, they were put aside.

I took the fondant out of the fridge and let it sit for a while to loosen up. It was hard as a rock after being cold overnight. For the parchment square (that's what I'm calling the part that resembles the loading screen), I tinted the fondant with copper and brown. It got to be an eerie fleshy color. I cut out a square and got to work on the edges. To make it look like torn paper, I took the flat side of my tracing wheel (a sewing instrument that I use as a fondant cutter) and scraped away the edge, pressing downward and away.


Next was to paint the water stains. I diluted brown food coloring in gin and dabbed some on my finger tips. I lightly patted the fondant in several areas. This looked more organic than using a paper towel (which just left a uniform imprint). If I had a natural sponge I would have used that instead. For the blood drops, I diluted red and brown food coloring in gin. A loaded paintbrush of that stuff helped drip and splash some gore. If you haven't seen anything about Dragon Age ... well ... there's a ridiculous amount of blood in it. And here was an incidental FAIL. I spilled some of the "blood" on to my table and it instantly stained it. Be very careful, folks. My husband would've killed me if I got it on the new kitchen tile! Now our table has a light pink blob forever commemorating these cakes.


Next up was attaching the letters to the fondant. Here I used a paintbrush and some piping gel. This went ... okay ... it was pretty sticky so it took a good while to get everything in place. It was nice to paint the gel over the letters to give it some shine. I didn't know royal icing dried so dull. Some people say they add glycerin or corn syrup to it to prevent this. I also tried attaching the emblem but that turned out to be one massive FAIL. They crumbled, and it was too complicated to reconstruct the image. I ended up tracing it on to the fondant with wax paper and a toothpick so I could redraw it with royal icing later.


Next came the icing. Making chocolate buttercream was a great WIN. It was easy to work with and super yummy. I made one batch of that as well as a batch of regular buttercream. Both went into Tupperware and were refrigerated.


Sunday was busy busy. I leveled, torted, and filled the cakes.


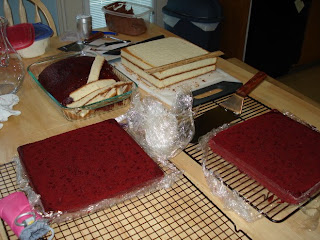
That picture shows how much air was in those cakes. Next time I want to try something much denser. I trimmed the sides by laying a ruler on top and cutting along the edge with a serrated knife.

After letting the buttercreams get to room temperature, I put on a coat of chocolate on to the vanilla cake and a coat of regular on the red velvet cake. The chocolate went on nice and thick so I didn't need a second coat.


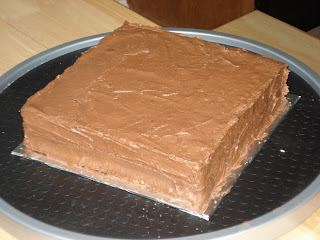
I love my steel scraper. It looks like a spackling tool. It's heavy and sharp ... it got the sides of my cake pretty smooth. If I were so inclined, the sides could have been absolutely smooth (but I got lazy). I highly recommend purchasing a quality version of this instrument.


The red velvet cake had so many crumbs showing, it was almost pretty! I let the first coat firm up in the refrigerator before adding a final coat. WIN! The final coat covered it very well. My husband couldn't see any red crumbs. Unfortunately that ate up most of the icing, so there wasn't as much left to decorate with. There was plenty of chocolate to get 2 borders of shells and some swirly thingies on the side. The regular buttercream had to settle for 1 border of shells and some swirlies on top and the sides.

In an earlier post I complained about not having a tilting lazy Susan. To compensate, I rolled a towel and shoved it under one side of my cake board. Good enough for a WIN!


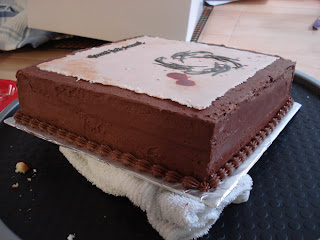
By Sunday evening my cakes were happily resting in 12" x 12" boxes in my refrigerator. The next day my husband and I carefully delivered them into the fridge at work (luckily they were just cleaned out last Friday, otherwise they'd never fit). I waited until 4:00 to unveil them so everyone could take a break from fixing bugs.


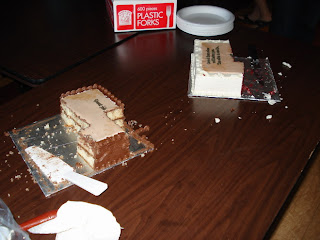
I set out the cakes and took a picture (above) so I could send it out with an email. Once I got the email out and walked back to the break room, there was already a crowd of people with plates, forks, and pastry servers. BUT it did take a while for someone to gain the nerve to cut into one of the cakes! People were surprised that I had decorated it myself. I got several questions on what icing I used. It was funny because people were taking such itty bitty pieces so it could be shared by everyone. By the end of the day, all that was left was a scrap of fondant that said "betray"!!!


The cakes were well received. I'm especially pleased because I'm proud of the work I did. Let's recap the highlights, shall we?

FAILs:
  • the royal icing for the emblems was way too thin to be taken off of wax paper
  • baking strips are a necessity; all of that extra cake could have been eaten by starving programmers
  • pink blob on dining table, courtesy of my clumsiness
FTWs:
  • marshmallow fondant: easy and tasty
  • royal icing lettering can be made well and far in advance; try tracing your favorite font!
  • chocolate buttercream was very stable to decorate with (perhaps it was all the cocoa butter)

Digg my article

Friday, August 21, 2009

Marshmallow Fondant

I made some marshmallow fondant. It was pretty easy to follow the Wilton recipe except that they say a bag (16 oz) of mini marshmallows but the bag I had was 10.5 oz. I used my food scale to help out making a half batch instead of a full. I figured why waste food if it doesn't turn out well? My lump of stuff is resting overnight in the fridge. I should have snuck a taste before I put it up ...

Dragon Age: Origins

The baby woke up briefly and now I can't get back to sleep ... so I might as well blog about my progress. I've started work on my Dragon Age inspired cakes. The plan is to have 2 10" square cakes that look similar to the loading screen of the soon-to-be-released Dragon Age video game (coming this fall!).

Both will have:
  • chocolate buttercream icing
  • reverse shell borders with the chocolate buttercream
  • 8" square of fondant on top made to look like old parchment paper
  • splatters of red food coloring mixed with gin to look like blood
One cake:
  • French Vanilla cake (Duncan Hines)
  • chocolate buttercream filling
  • says "Great job, team!" in royal icing
The other:
  • Red Velvet cake (Duncan Hines box cake)
  • cream cheese filling (Pilsbury tub frosting)
  • says "One of these cakes will betray you. The other is poison." in royal icing
Here are the templates I made:


I started yesterday evening by making some dark brown royal icing. What sucks is that it took me a while to get a satisfactory color. In the process I've used up most of my brown food coloring gel. I know, I know ... the coloring looks a little like dog poo, but it actually looked good once piped and dried. I've learned to be very careful with black food coloring ... you're not really making the color darker ... more like you're adding gray.


I even tried adding a little red food coloring to try to get closer to the color I wanted. It was interesting though. When I was washing the icing off my tools, it ran green.

I layed down some wax paper over my templates and started piping. Piping out the emblem was awful. Earlier in the week I had tried doing that with melted chocolate. It looked great but I couldn't peel it off the wax paper. I think trying it with royal icing is still a good idea, but I need to really thin it out. Freestyling the print also did not go well.


Next was tracing the print from the templates. That turned out more awesome than I could have imagined! Here are my tracings using Wilton round tip #3.


This took a long time to do because I wanted to be as accurate as possible. I want the development team to see this and immediately recognize the designs. There are multiple copies just in case there are any casualties transferring them off the wax paper and on to the cake. I got better each round I did (finally learning I should draw the 's' in reverse to look better). The royal icing popped off well after drying overnight.

Here is the rest of the TO DO list:
  1. make a half batch of marshmallow fondant (this will be my first time to make it; my research leads me to believe this is easy and tastes better than store-bought fondant)
  2. bake the cakes (which will take forever because I only have 1 10" pan and I need 4 batches made)
  3. cover cake boards with foil (I'm actually using the cardboard backings for comic books covered with regular foil)
  4. roll out / cut 8" square and decorate the fondant (which includes tinting, tearing the edges, attaching the royal icing letters and emblem, and splashing it with "blood")
  5. make the chocolate buttercream (this will be my first time to make it; it's just a regular Wilton buttercream recipe + cocoa powder)
  6. trim and torte cakes (which includes placement on cake boards and filling)
  7. apply crumb layer to cakes (this will be my first time to try this strategy; I expect it to go well as will the final layer of icing)
  8. apply the final buttercream layer
  9. lay decorated fondant on top
  10. decorate borders with reverse shell design (this will be my first time to try this)
Sounds like a lot ... which it is. That's why I've started so early for a Monday finish line.

Stuff I need to purchase:
  • foil
  • 10" x 10" x 5" cake boxes

Sunday, August 16, 2009

Cake Decorating TV Shows

My sister-in-law Ashley told me about a show on TLC called "Cake Boss". I watched the episodes they had on TLC's website today and was amazed! They do beautiful work. These last couple weeks I've been watching several episodes of "Ace of Cakes" from Food Network. It's wonderful to see how these people run their businesses and be challenged by their customers' requests. What's even better is when I pick up on something they do that helps me decorate my own cakes. On Ace of Cakes I saw how Ben trimmed the side of a cake by laying a ruler on top and cutting along the edge. On Cake Boss I saw Buddy ice a cake with a scraper and made a super smooth edge. I'm going to keep an eye on these two shows and soak up anything I can learn.

Saturday, August 15, 2009

Veil Painting Cake: Completed

Veil Painting Cake
(+5 skill points -> 100/400)

Today I made a "Veil Painting Cake" for my brother-in-law's 17th birthday. A veil painting is a style of water color that he took a liking to recently. I figured since painting on fondant is kind of like water coloring, it would be a cinch! I think it turned out ok, and I learned more things about cake decorating.

This is a 10" square cake (Duncan Hines French Vanilla) with buttercream icing. There is a 8" square of fondant on top that was the canvas of the veil painting. I don't have pictures of the entire process because I was short on time.

OH! So I went to Ace Mart. It was so much fun! I've never been in a restaurant supply store, so this was a real treat. They even had molds for ice sculptures! I bought:

  • small icing spatula
  • medium icing spatula
  • scraper
  • 2 cake turners
  • small dredger
  • small ladle
  • 4 plastic trays
  • long dowel for rolling fondant (which the cashier told me that if I get pulled over by a cop and he sees that in the car, I could be sited for carrying a deadly weapon)
  • stack of cake boards
Back to the cake. Like I said, I learned a lot. It was slightly a bummer that when the cake was presented at dinner (we were at the Oasis), it was past sunset so it was hard to see the brush strokes ... it just looked like a blue cake. Tyler did recognize it though.

Fails:

  • I tried to use the cake turners to flip the cake (10" square). The cake split down the middle! You couldn't tell once it was iced ... except for when he was cutting the cake and some slices were split!
  • I was running very low on time. I wanted to do some errands in the morning (like go to Ace Mart), but my husband asked to sleep in for another hour (he was going to watch the baby for me). It took a lot longer to drive down to Ace Mart than I thought, and I had to get some other supplies from Hobby Lobby. I rushed home and started right away; the cake was done after 4 hours but it really could have used 8 hours. My husband helped out by making the buttercream and reviewing my initial design.
  • Since I was pressed for time, the paint layers on the fondant didn't have sufficient time to dry completely. Additional layers smudged the previous layers. Veil paintings are very time consuming because each layer must dry completely before starting the next. I rigged a fan to point at the fondant to help out.
  • Again, because of time, I couldn't even out the top layer of buttercream well. It definitely was not as flat as I wanted it to be.
  • For a 10" square, you really need 2 batches of cake mix to have it layered. After I trimmed the cake, it was too short to put in filling.
  • I'm still not awesome at shell piping, but I'm getting better!
  • I didn't bother writing "Happy Birthday, Tyler!" because it was way too many letters and I was out of time.
  • Candles! I forgot all about candles. I think it would've been nice to include at least one. :(
  • My cake decorating books suggest first covering the cake with a thin layer of buttercream to seal in the crumbs. The final thick layer should come afterward. If I had tried to do that I wouldn't have cursed out loud so many times when the icing kept pulling up the cake while I was spreading it.
  • Now I understand why there are tilted lazy susans. It was very difficult to pipe the bottom border at that angle!
FTWs:
  • I bought 10"x14" rectangular cake boards from Hobby Lobby. I was able to use my paper cutter to make a 10" square for the cake. Covering it with foil is easy!
  • Now that I have multiple spatulas, I was able to make crisp edges. I held one spatula against a side and used another to build up a corner with the buttercream. Here are the instructions: http://cakecentral.com/articles/109.
NOT MY PHOTO
  • I read something somewhere saying that if you dip your spatula in hot water, it'll be easy to smooth out the buttercream. That worked like a charm! It was better than smoothing it with parchment. If I had bunches of time, I could have made it very smooth and the corners crisp.
  • I saw Ben on Ace of Cakes trim the sides of a rectangular cake by lying a ruler down on top and cutting down along the edge with a serrated knife. That worked well for me!
  • It's very nice now to have a lot of the tools I need. I really like my new spatulas. The cake pan worked well. I bought a t-square ruler to help me make a perfect square "canvas". I also picked up a compass to help me measure out perfect circles in the future. It's good to know that all the money I spent is an investment for a very fulfilling hobby and some day my daughter will be using them (she's 3 months old right now).


Thursday, August 13, 2009

Cubism

Yesterday I tried to make a cube cake. It was intended to be a baby block cake for the Hays (they had a baby boy last Saturday). It didn't go so well. Instead of baking a cake, I decided to save some time and buy a pound cake. That part at least turned out awesome. It was so easy to carve and pound cake is always delicious. I was shooting for a 3.5" cube but I underestimated how thin the filling layer would be, so the cube ended up a little squat. I covered it with tub icing and tried to put on a layer of fondant.


I really don't understand how you get fondant on without having pleats on the side! I've been watching Ace of Cakes and it looks so easy when they do it. I've been reading cake decorating books and they don't say anything about how to not f*@& it up!


I think I did better than the last time I covered a cake with fondant, but not by much. In the end, I decided decorating it like a baby block would take a lot more time than I wanted to spend. We bought them some Huggies baby wipes instead.

Monday, August 10, 2009

Gift Box Cake: Completed

Gift Box Cake
(+5 skill points -> 95/400)

Last weekend my parents celebrated their 63rd birthday. It was the first time for them to have both grandkids there at the house (pics here). I mentioned in an earlier blog that I was going to attempt the gift box cake. After everything was said and done, they didn't even cut the cake at the party because it was "too pretty"! We settled for ruining a chocolate HEB cake instead. The pretty cake got eaten the next day for breakfast ;) This was a big learning experience! A lot of work got poured into this, but there was apparently plenty of room for improvement.

I bought a 4 piece round cake pan set with a 40% off coupon at Hobby Lobby. I didn't want the gift box to be too short, so I used the 8 inch pan from the set instead of my usual 9 inch springform pan. The pans were great! The baking strips did their job, and the cake easily slid out after 15 minutes of cooling. The cake does take longer to bake with the strips than without. I think this cake took an hour at 350 degrees.


While the cake was cooling more thoroughly, I started on the fondant gift bow so it could dry a little before I needed to assemble it. I used paper towels to support the shapes. I wanted them to look more rumpled, but that was hard to achieve without many cracks or tears. I tried draping the strips over pens and pencils to make it look natural, like it was ruffled.


The absolute hardest part of this entire cake was coloring the fondant. I wanted a dark brown color like in the example gift box cake. It seemed to take forever to kneed in that much color. My arms were so tired! I added a touch of black food coloring as well to help speed it along. I wear gloves when I work with fondant so the oils from my hand don't get mixed in and so my skin doesn't get stained from food coloring. It also avoids getting all kinds of icing trapped under my nails!

Once the cake was cool, I torted it with a cake leveler and filled it with some left over cream cheese tub frosting. Nothing beats the taste of tub frosting in my book! Leveling it went ok except for one side where the cake was a little tougher other areas. The leveler took a long sliver of cake with it, but it wasn't very noticeable.

Afterwards came the buttercream. What was most difficult was getting the blue color that I wanted. It looked great in my head, but too dark in reality. At least I got the consistency I wanted from the buttercream. I was able to use the smoothing technique I learned from this online video. Once the buttercream is dry to the touch, I got a piece of parchment paper and layed it against the cake. Using my fingers, I rubbed the cake until the icing was smooth. You wouldn't think you could rub it so firmly, but if your icing consistency is good, it'll stand up to it!

Remember: this is a gift box cake. I first put a layer of off-white colored buttercream on the entire cake. Once that firmed up in the fridge, I covered the bottom half with strips of parchment paper and then layered blue buttercream on top.

After smoothing the blue, I carefully removed the parchment paper ... leaving a gift box top!

After that, all that was left was to have fun with the decorating. I cut out circular fondant shapes with 2 round cutters and stuck them to the cake with a little water. The bow went on top.


The most disappointing part of the cake was my piping. I piped stitches on to the fondant ribbons and wrote "Happy Birthday" on the little banner. The buttercream recipe is just not good for this delicate work. I tried to add some corn syrup to smooth and thin it out, but it didn't really help.


I was unhappy with my first "Happy Birthday" piping that I scraped it off and used the back side of the banner to try again.

So in the end, I learned a great deal about cake decorating! I even learned some things afterwards. Some websites warn that fondant is no good in the fridge because of the condensation that creates little sweat puddles. This cake held up for a night just fine, but I won't push it with a full blown fondant covered cake. By the end of the night of the party, the fondant bow had lost all its body and lay limply on the cake. I know if the cake needs to be out and about, beware of the sag! I learned I really need to practice piping ... if I can't beat HEB decorated cake, then what's the point?? Lastly, I learned that I might need to cut the cakes I make because no one else will.

Wednesday, August 5, 2009

Shopping!

Have you seen how pricey the cake decorating stuff is at Michaels or Hobby Lobby?!? This is getting to be an expensive hobby. An expensive delicious hobby. But I hope to strike gold at Ace Mart Restaurant Supply (http://www.acemart.com/) in North Austin. If their storefront is anything like their website, they have everything I need for much cheaper. Bed, Bath, & Beyond had only 1 kind of icing spatula ($9.99) but Ace has an actual selection and for less $$$. I'm hoping to get:
  • cake pans
  • food coloring
  • parchment triangles
  • spatulas
  • cake turners (I had to look these up...they are for lifting cakes)
  • decorating comb
  • fondant
And if they don't have what I want, there's another place close by called All in One Bake Shop (http://www.allinonebakeshop.com/). I'm planning on hitting this place up early Saturday morning so I can get everything I need for making a cake for my parents and for my first class.

Birthday Aspirations

I've got a few ideas for cakes to celebrate some upcoming birthdays. This weekend my family is celebrating my mom and dad's birthday (hers was July 23rd and his is August 9th). I'm going to try to make a "gift box" cake with a fondant bow and decorations. Here is an example:

http://www.make-fabulous-cakes.com/birthday-cake-decorating-modern-cake.html

EXAMPLE ONLY ... I COULD ONLY MAKE THIS IN MY DREAMS!

The color scheme is fab, but instead of green, I'm going to try a dark blue.

My brother-in-law's birthday is next week. For that I'd like to try to re-create a veil painting. Don't know what that is? Well I can tell you that it's impossible to find a tutorial on the internet! I had to go by memory of how he described the process that he did in art class. It's a type of watercolor style that he was quite taken with.

http://sophizzlie.deviantart.com/art/Veil-Painting-129653686

EXAMPLE ONLY ... I COULD ONLY MAKE THIS IN MY DREAMS!

So the plan is to buy some food coloring, mix it with alcohol, and paint on to white fondant. I've read that painting on fondant comes out looking like watercolor. I sure hope they're right!

Coming Up Roses

Some day I'll get this right. I'm definitely getting warmer. I've spent some time practicing roses. Using royal icing fared much better than buttercream. Sort of. Royal icing is good stuff, but very stiff. Both nights my parchment bagged popped. Yesterday icing spewed out the side and today the whole coupler shot out.

Yesterday
Today
I'm getting better, I swear! I just need to watch a real person do it. I've asked my friend Jenny to go over a few things with me next week. She took the Wilton Course 1 and enjoyed it.

As Seen On

As Seen On Capital Confectioners