Ruffle Flowers
I've been asked to do a demonstration at my cake club's next monthly meeting. Specifically, I was asked to figure out how to do the fondant billows, but I like to demo several techniques when I get the chance. The demo will be called "Trendy Fondant Accents" and will cover 3 decorations: billows, pom poms, and ruffle flowers. These are items I'm seeing all over Pinterest, facebook, and in cake deco magazines. After some internet-scouring research, I came up with my own way of doing things.
First up are the ruffle flowers. These are fab because they don't require many fancy tools, they don't take long to make, and they don't need any dry time if you're in a hurry. I don't know who invented or made these very popular, but here are a couple sites that helped me.
References/Inspiration/Tutorials
Tools
- fondant or gumpaste
- circular cutters in various sizes
- tool for ruffling/curling edges (gumpaste stick tool, ball tool, skewer, toothpick, or even the end of a thin paintbrush)
- edible glue (royal icing, piping gel, tylose glue, etc.)
- foam pad (optional)
- something to go in the middle of the flower (fondant button, dragees, candy, etc.)
Instructions
1. Roll out your fondant (or gumpaste) very thin on a non-stick surface. Here I am using a cutting board dusted with powdered sugar.
3. Place your shape on top of a foam pad. This is optional if you don't have one, but it does make ruffling a bit easier.
4. Using your favorite tool for curling edges, thin out the edges of your shape by applying pressure. Once the edges are thinned out, apply more pressure to really start curling.
Here I am using the thin stick tool from Wilton's gumpaste tool set. To thin out the edge of my fondant, I rock the tool back and forth within a single petal. Once thin, I press down firmly with the tool and rock back and forth again, still within a single petal.
Notice that I'm placing the stick tool so that the edge of my fondant meets with where the tool begins to taper. I found that this is the best way to get a tight curl. I don't roll the tool along the entire edge; I pick up the tool and start again on the next petal section. Make sure the end of the tool is always pointing to the center of the cut out.
5. Curl all your shapes until they are nice and curly and frilly.
If you are using the ball tool for ruffling ...
- Thin the edges out by sliding the tool around your shape with medium pressure. I move the ball in one direction along the edge of the cut out (like drawing large O's several times). At this stage, I have the ball completely within the cut out.
- Once thin, move the ball so it is halfway on the fondant edge and halfway touching the foam pad. Now you can go to town on it by applying firm pressure and sliding the tool around the edge several times. Sometimes I rock back and forth along a section too, but always keeping the ball halfway off the fondant.
6. Dab some edible glue in the middle of your largest cut out. Here I am using tylose glue.
7. Place the next size cut out on top. Apply pressure to the middle of the cut out so it can adhere to the bottom piece.
You can use your ball tool or just your finger tip to gently apply pressure.
8. Repeat with remaining cut outs.
Gently fluff up and re-shape any smooshed sections with your stick tool.
9. Now for something to go in the middle! Here I dabbed some edible glue on the top-most piece and dropped in some dragees. Use the stick tool to help place them nicely.
I made sure the middle dragee I chose was large and the rest were smaller.
10. You can allow your flower to dry if you like. Clean up any residual powdered sugar by brushing clear alcohol gently on the flower.
Done!
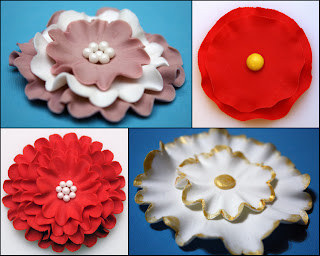
Try cut outs of different colors!
Here is a round cut out curled with a ball tool.
The center is a mini m&m!
Large with small cut out. Edges painted with gold luster dust mixed with Everclear.
Easy peasy! Have fun!


