
Christmas 3 Tier Cake for the
Faith Presbyterian Child Development Center

It's been a long time since I've made a 3 tier cake. Recently I wanted to really challenge myself and the holidays gave me many options for donating a large cake. My mother-in-law is the director of the Faith Presbyterian Child Development Center and every year they have a Christmas celebration for all the kids and parents. This was my best shot at feeding a lot of people for the sake of my skill development.
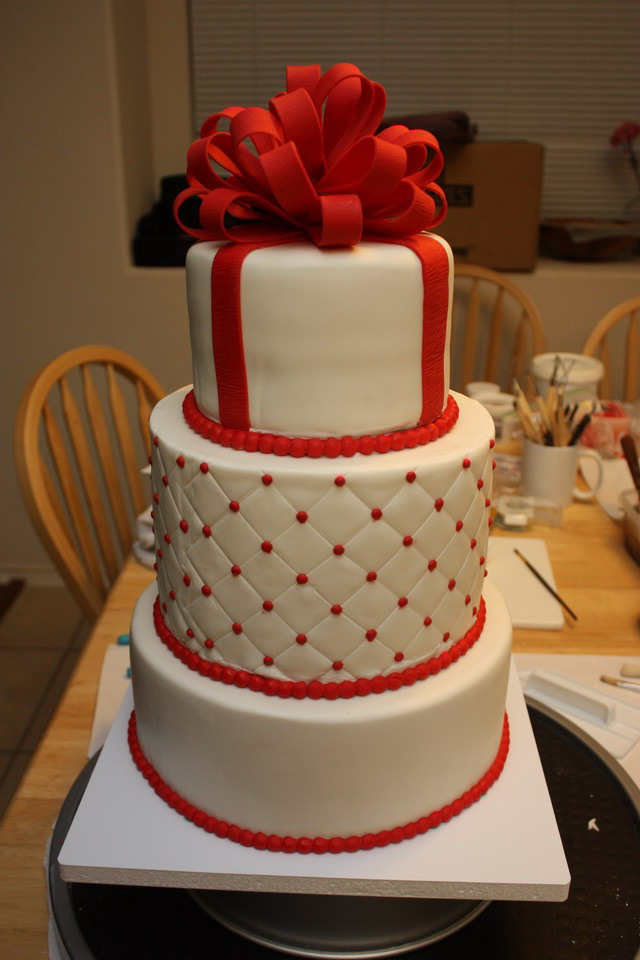
This cake had many opportunities for learning ... stuff professionals whip out every day, but for a hobbyist with little free time, these were big milestones. This cake was about 20 hours of work and cost about $50 in materials. For the last 3 nights in a row I worked on it from 10 PM until 2 AM. In the end, it was 20" tall and weighed 20 lbs. Sit back, this is a long post ...
Stats:
- 6"x4" and 8"x5" vanilla round cakes
- 10"x3" chocolate round cake
- tiers iced and filled with white and chocolate ganache buttercream
- tiers covered with marshmallow fondant mixed with modeling chocolate
- Satin Ice fondant + Tylose bow
- fondant + modeling chocolate accents and borders
- 12" square foam drum
Servings (based on a 1"x2"x4" industry standard serving size):
- 6" x 4" round: 113.09 cubic inches / 8 cubic inches = 14.14 servings
- 8" x 5" round: 251.32 cubic inches / 8 cubic inches = 31.42 servings
- 10" x 3" round: 235.61 cubic inches / 8 cubic inches = 29.45 servings
- grand total of about 75 servings

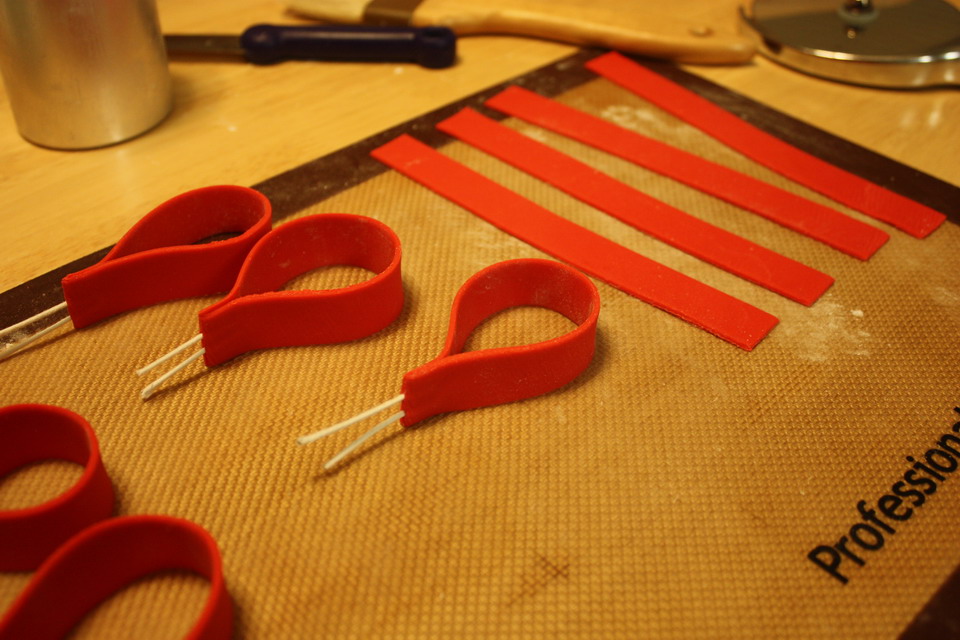
I've never successfully made a loopy fondant bow before. Last time I made my loops too narrow, too long, and too few of them. This time I made some paper templates to get an idea how big each strand should be.


Since my top tier was a 6" round, I made 6 1/2" x 3/4" loops so the bow would fill most of the area. After arranging my paper templates, I figured I'd need about 20 loops for a full bow. Using some red Satin Ice mixed with Tylose powder, I rolled and textured strips with a fabric pattern roller. It's a pretty subtle texture, but it was nice to finally have a good reason to try out this little tool.


For some reason I got the idea in my head that I needed wires in the loops. I thought the wires needed to be attached to each other and stuck into the cake. These are completely unnecessary and in the end I cut them off. I also made a drying rack out of a 1" diameter PVC pipe covered with cling wrap. This wasn't really necessary either. I left some loops out to dry on their side; the strips were narrow and stiff enough to maintain a good shape as they dried. The rack was nice to have them all consistently the same shape, but it was also nice to have some loops that were more circular for the center pieces.
What I did NOT do that was pretty necessary was trim the ends of the loops to a point so they would have more room to overlap when assembled. Luckily after drying, the fondant was still flexible enough for me to trim off the corners with scissors without doing any damage.

I didn't really know how to attach all the loops together, so I wet some wads of fondant and sandwiched the pieces in layers. While drying, I used some foil to cup the bow together and some bunches of paper towel pieces to support the loops that weren't lying on their side.

Once on top of the tier, I tried to smoosh in some red royal icing in between the loops for more security. Using a paintbrush, I mashed the icing into what crevices I could manage to get it into and it seemed pretty sturdy afterward. All in all, it was a successful bow except for the pieces of wire that I couldn't remove. I informed my mother-in-law that the bow was not edible and needed to be removed during service. She e-mailed me later and said that they ended up saving the bow after cutting the cake and had brought it home with them!
Now for the top tier.

My 6" round pans are only 2" tall, but the rest of my round pans are 3" tall. I was shooting for all 4" tall tiers, but quickly decided that, in the interest of saving time, mismatched tier heights were ok. After torting, filling, and icing, my top tier came out to about 4" tall.


The top tier didn't get as much attention when icing as the rest of the tiers, and it shows in the fondant. I used a thicker layer of icing and did not take the time to make it very smooth or level. The result are less-than-crisp edges and lumpy sides.

For the ribbon accents, I made the major mistake of not properly measuring my red fondant strips. I came up short on one side (visible in the full cake photo at the top of the post), but refused to re-do it. It was getting late, and I was in "screw-it-all" mode. They were also not centered very well ... I was getting pretty upset and frustrated at the cake ... but that could have been because my toddler was supposed to be in bed but instead she was screaming about not wanting to go to sleep. I had to stop caking completely so I could help her take a 15 minute potty break which was probably just her excuse to get me to sit with her so she wouldn't have to go to sleep. I asked hubby to take over so I could get back to wrecking my cake. Once she settled down, and I got the bow on top, the cake looked ok and I felt much better.
The middle tier ...

I wanted to try wrapping the cake in fondant pieces. Above is just the top covered in fondant with the edges trimmed off with a paring knife.

I rolled and trimmed a large rectangular strip for the sides on to freezer paper. When ready, I cut the freezer paper closer to the size of the fondant. This let me handle it easier as I wrapped the cake with it.

I don't think the result was really worth the effort, but it was good practice if I ever use a medium that requires this method (e.g. marzipan or modeling chocolate). I used my quilt texture sheet to make some diamond impressions, then I deepened the lines with a wooden clay modeling tool.


In the line intersections, I piped a dot of red royal icing and patted down the points with a damp paintbrush. Cute, huh? I sure thought so, until about 20 minutes later I noticed ...
aaaaiiiieeee!!! redrum! redrum!

My paintbrush must have been too damp. The moisture in each dot had built up and began to drip. I was able to wipe away some of the worst drips with a damp paper towel, but I didn't touch up every single one. I had always used a damp paintbrush to pat down my royal icing tips before, but that was on cookies that were lying flat. Next time I do it vertically I'll be more cautious.

Another disappointing issue was how the beginning and end of the impression mat lines eventually crashed into each other. Not sure if this is avoidable, or if I'll always have a "back of the cake" when quilting.
The bottom tier.

Mmm, chocolate. I put 2 Betty Crocker Super Moist (pudding included) Chocolate Fudge cake mixes in my 10"x3" round pan and it came out perfect; no leveling required. I mixed a 3:1 semi-sweet chocolate to cream ganache to some American buttercream for the filling and icing. This was a nice medium to work with because it became pretty solid in little time. I could have spent hours perfecting and smoothing the icing.

It was a little frustrating covering it in fondant since it was a large tier. I had to roll out a circle of fondant at least 16" wide. Since my mat was too short and my tabletop has creases in it, I rolled the fondant out on freezer paper taped down to the table. On my first try, I placed the fondant too short on one side and couldn't correct it, so I peeled it off. I had to keep telling myself, "It's ok; you almost had it. You almost had it. You can do it on the second try. You can do it." Once the rage was soothed, the fondant was re-kneaded, and I tried again with better placement. I was pretty pleased with the final fondant covering, pretty crisp and smooth.
Now for some words on structure.
My local cake supply store, Make It Sweet, had some nice, thick, pre-cut foam boards to be used as drums/bases. I bought a 12" square board for $3.65. Since this cake would not be refrigerated all day and traveling a good distance (first the commute to work, then across town during my lunch break), I wanted to try a plate and pillar support system. I bought the Wilton smooth edge plates (6" for $2.99, 8" for $3.99) and 2 sets of 4 hidden pillars ($3.19 each). Even with my 10% cake club member discount, my support system cost $16.58!


I piped some royal icing to my drum and plopped the 10" tier on top. I used the 8" plate to indent markings on where the columns should go when centered. Using a wooden skewer, I measured the height of the cake. After some thought, I ended up hammering in 4 wooden skewers where the pillars would go to make sure the bottom was firmly attached to the drum. This cake was going nowhere!


I wasn't sure what order to put things together, so I attached the pillars to the plate, then pushed the whole thing down into the 10" tier. I don't think all the legs went down straight, but it wasn't too bad.


I repeated the process for the 8" tier with the 6" plate, but apparently I didn't trim the columns short enough.

There was a noticeable gap between the tiers. These plates are pretty darn thick. It's good that they're sturdy, but they are probably too thick. I needed to come up with a way to help hide the pillar game, the plate thickness, plus my cakeboard height.

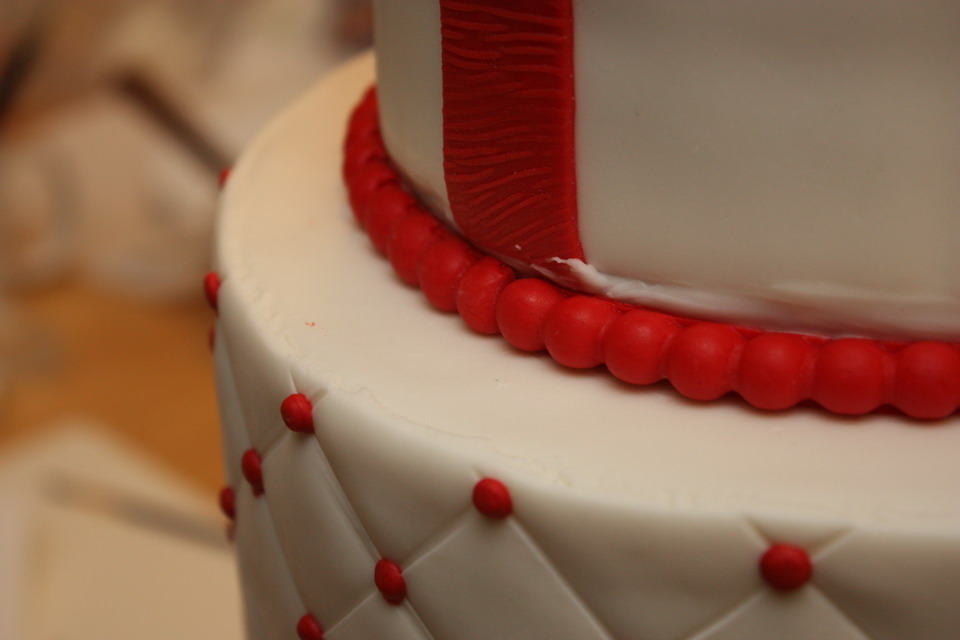
I ended up piping some white royal icing into the gaps and smoothing it out with a paintbrush, then covered the royal with a fondant bead border. I developed an easy way to use the Wilton baroque silicon mold that I can write a tutorial on later. Above you can see that even the bead border wasn't tall enough in some areas to hide the icing.
Once assembled, I needed to remove some extra powdered sugar that showed on the bow, tiers, and borders. I reached up for the Everclear above my fridge and pulled down an almost empty bottle. I turned to my husband and said, "Really?" He said, "What?" I said, "I did NOT use all of the Everclear just on cake." I need to get him his own booze! There was enough left for me to brush on and remove the excess powder.
A long time ago I read that a wedding cake should look good from 10 feet away, because that's how far away most people would view it. This cake could do at least that, so I'm pretty proud of myself. It was tall and impressive for a non-wedding event. Since it was an event mostly for kids and parents, I wasn't terribly concerned with achieving heights in taste. My focus was on decorating and stability, so my media was well suited for that. The cake was about 20" tall (just 1 inch shy of fitting in my mini fridge!!!) and weighed 20 lbs. I had to remove a shelf from my big fridge so it could sit there overnight. I managed to find a nice cardboard box from work that the cake could fit in. We had to cover the open top of the box with plastic wrap because it was raining that day. The cake sat in my trunk while worked for a few hours because it was colder in the parking garage than inside my office. It traveled well. Hubby carried it for me because I'm in my third trimester of pregnancy and am carrying enough weight as is! My mother-in-law e-mailed me and said everyone loved it, even the taste. I'm glad it's over and my kitchen and life have been restored to normality.
FAILs:
- Scratch materials should have been made and prepared more in advance. I could have made my fondant, buttercream, and kneaded my modeling chocolate many days ahead of time, but didn't. Poor time management and lack of preparation makes for a sleepy mom/wife/employee.
- I should have taken the time to measure my fondant correctly. I had a flexible measuring tape on the table, but was too lazy to use it.
- Don't get royal icing too wet!
- I learned how to make a loopy bow!
- Plate and pillar systems makes for peace of mind. In the future I might invest in official SPS materials. I hear the plates in that system are much thinner.
- My first molded bead border turned out great with little effort.
Get all that? Thanks for sticking with me! Have a Merry Christmas and Happy New Year!
